
ACDSee Software for Organizing Digital Scrapbooking Supplies
Reported by Jessica Ripley

Ah the feeling of being organized! It's wonderful when everything is in its place and right where we need it. Because just as we promised ourselves we would back on January 1st, we have contained not only our regular household clutter, but also kept all crafting supplies together by color, manufacturer, style, and type right?
Ha! Me neither.
While part of me screams for color coding and alphabetizing wherever I can manage it, sometimes the task of getting to that organized point seems just too daunting to tackle. Where I have the most trouble lately isn't household or crafting clutter however, but rather in one of my new found hobbies, digital scrapbooking. Any digi-scrapper can tell you (or I'm sure you know if you are one) that there are so many wonderful digital supplies to be had at affordable prices online (if not free), that downloading a new kit or alphabet soon becomes a cheap thrill that you just can't get enough of. Before you know it, your hard drive becomes a haven of digitized ribbons and papers that isn't as easy to navigate through as it once was. You forget what you have, or don't realize how perfectly some pieces fit together, or just plain get tired of searching through files and files of supplies and give up.
Though I still consider myself a beginner digital scrapbooker, I definitely have my fair share of supplies collected. I heard about ACDSee Photo Organizing software from a few friends and also saw it discussed on a couple of message boards. Many swore by it, and said it made putting together a digital layout so easy. So, when I discovered that there is a free trial offered on their website, I decided it couldn't hurt to download it and see for myself.
The download from start to finish was very quick, about 5-6 minutes. You must enter your first name and email address to access the download, so be sure to uncheck the special offers box if you do not want to receive any additional email from ACDSee (future coupons, tips, etc) when you sign up.
The first thing I noticed upon the program successfully installing in my PC laptop was that it automatically defaulted to the "My Pictures" file. I could see all folders located within the file instantaneously. Hovering over any image gave a slightly larger preview, and I could also double click on any image and see a full screen view immediately. ACDSee advertises on their site that they are "the fastest viewing software around", and after playing with it I have to agree. I also found that you could change the default folder which automatically opens at start up, a very nice feature.
I decided the try out the software not to organize my digital photos at this time however (we'll save that for January 1st next year), but to get all those digi-supplies managed. Therefore now came the time to navigate through the program itself and see how simple it really was to do so. The remainder of this article isn't a tutorial for the software, they do offer help and tips if you decide to give it a try, but rather a report of my experience with it. With that in mind, I consider myself only slightly tech-savvy, meaning if it was too much of a hassle to figure out, then forget it.
The biggest positive to using ACDSee as a digital supply organizer is that it recognizes over 100 files types, including; BMP, GIF, JPG, and PNG, which are those that I am most familiar with (JPG and PNG being the most common in my digital scrapbooking supplies). It took me very little time to find the Catalog Wizard, which allowed me to select several file folders in my computer to fall under one large category. This is one step that I may have saved myself some time with the little organization which I had already done within my hard drive. I did not have to go to several places to find my digital supplies, I do keep them all under one big file called "Downloads". If it wasn't for this, it may have been a headache to find them all.
The wizard then guided me through adding "database" information for the catalog, including a caption ("Digital Scrapbooking Supplies"). It also allowed me to add an author and notes if I desired.

Once all folders that I wished to organize were added to the wizard, I was warned by the software that cataloging a large amount of files could take some time. Cataloging each of my chosen items into the "Digital Scrapbooking Supplies" category took 6 minutes to do so for 873 items. So it didn't seem very long at all, especially since a small thumbnail preview of each image is shown as it is added to the database. It was kind of fun to see those supplies I forgot I had already!

The display of all items is very easy to read and user friendly.

I had a bit of an "Ok.... now what" moment once the files were categorized into the Digital Scrapbooking Supplies database. I didn't find the software as informative on the steps to take next (though I can't state that I read the help menu, I'm more of a touch and do rather than a read and do person). I knew from experience of using other photo organizing software that I could add "tags" or "categories" to each image to organize them even further, so that's what I set out to do next. It was very easy to add new categories. Just click the "new" icon and you're in business. I started by adding any I could think of as a general category, such as solid paper, patterned paper, and miscellaneous embellishments, and found that it is also possible to add sub-categories which is a wonderful feature. I used this to add the subs buttons, ribbons, etc., to the miscellaneous embellishment category. I also added a few colors to the paper categories.

Then came the most tedious part of the process, tagging all of those files with the individual categories to make finding them easier when the time came. There are two ways to add items to a certain category:
- Drag and drop them onto the category name
- Right click the item and select the appropriate category.
If you drag and drop, you can do so with more than one item at a time which is a fabulous time saver. Simply hold control or the shift key while clicking each item to drag and drop them together.
You can also assign each item to more than one category, as many as you wish. It's all about creating a filtering system for the software to help you find what you are looking for. This can be addictive, but you'll learn what you need to stay organized as you go along. I quickly discovered that categorizing into "Ribbon", "Blue", "Polka-Dot", "Tied" was getting a little too ambitious. Even with the ease of doing it, to me the process of tagging each item did start to get a little old and time consuming. But, I really can't expect any software to automatically know that I classify that embellishment as a "tag", but that one as a "frame" can I? I would recommend, depending on how many categories you create, (to which there is no limit) and supplies you have, to do a little at a time so it isn't quite as monumental a task. Once all my items were categorized, it was time for the real test, creating a digital layout. I hit a small road-bump here, not sure of how exactly I was to get my nicely organized digital items into Photoshop Elements to actually create a page. What good would organizing in one program do me in the other? Just to see, I tried the easiest way possible I could think of to accomplish this. I clicked and held an item in ACDSee, and then dragged it into my already open Photoshop Elements in the start bar of my laptop. It worked like a charm. Talk about easy! Using both programs in that manner, I created the simple layout shown below.

for Funky Playground Designs.
Rather than searching through all my saved kit files to find the perfect blue paper, I simply clicked the categories in ACDSee "Solid Papers" and then "Blue" to see all that were available to me at a glance.

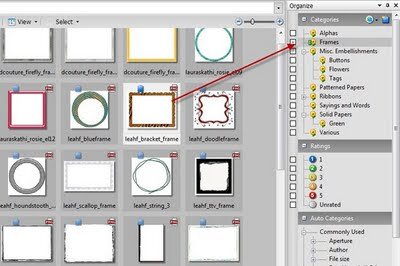
And again when I searched for a frame, I clicked on the "Frames" category which I had created and quickly found the one I wanted.
Using ACDSee to create a digital layout did not only save me some time (even though I had to invest some in the beginning), but also allowed me to utilize supplies together that I might not have taken the time to look for before. I could definitely now see what all the talk was about. Once the tedious part was done, I found the software to indeed be extremely helpful.
The cost of the photo manager alone with added download fees and a back up copy is around $40 which I do find a little pricey, but I also feel as if I've only touched the tip of the iceberg when it comes to what the software can do, and plan to test drive it until the trial expires and make my decision.
Pros:
- Lighting fast viewing of photos once they are in the software, including full-screen. This also makes the organizing easier to do.
- The software recognizes many file types, making the organization of all image files on your computer possible.
- Endless categories which you create based on your needs make it very user-friendly.
- Easy and quick to drag and drop files into Photoshop.
Cons:
- It seems the more organized you are to start, the easier it will be to use the software's capabilities (putting all of your supplies into one file for example).
- The categorizing itself is a bit tedious and requires work.
- I feel the software is pricey, especially since I already have organizing capability for photos with Photoshop Elements.
All in all, if you have digital supplies on your computer I really don't see how you can go wrong by not downloading the free trial to see for yourself how it will work for you.
How about you? Have you used ACDSee before and can offer any tips or suggestions? Any fantastic features that I haven't touched on here? We'd love to hear what you have to say.